
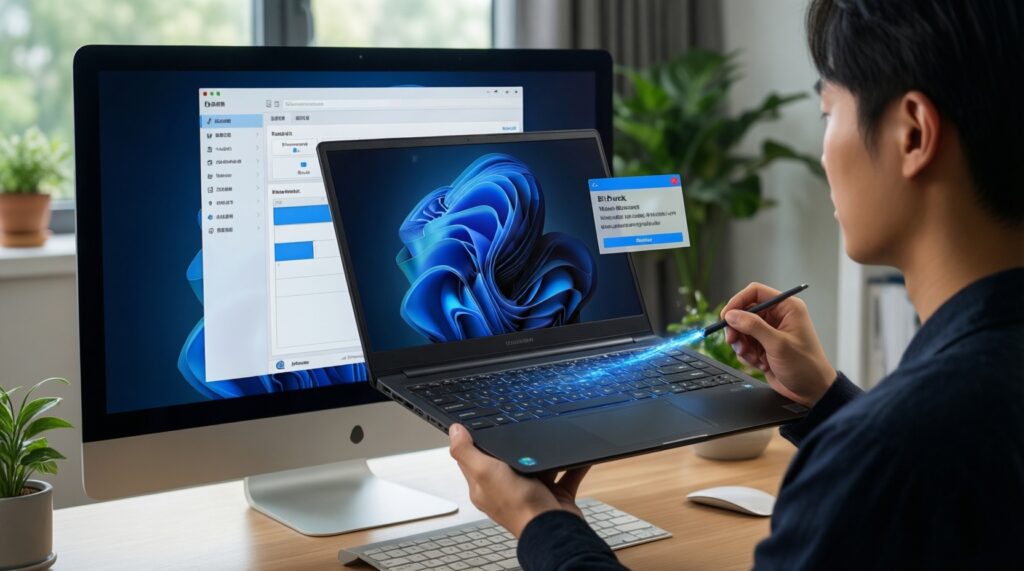
To upgrade Windows safely (including อัปเกรด Windows 11), treat it like a controlled change: make a restorable backup, export drivers, prepare bootable recovery media, verify app/firmware compatibility, then upgrade in a clean, predictable sequence. Finish with a tight post-upgrade validation checklist so performance, security, and device drivers are confirmed before you resume normal work.
Essential safeguards before upgrading
- Create at least one restorable backup (image) and one file-level backup, and verify you can see the backup files from another device.
- Export critical drivers and note hardware identifiers so you can ดาวน์โหลดไดรเวอร์คอมพิวเตอร์ Windows 11 quickly if Device Manager breaks a device.
- Prepare bootable recovery media (USB) and confirm you can boot into recovery on your specific PC (UEFI, Secure Boot).
- Record BitLocker recovery key, Microsoft account/admin credentials, and Wi‑Fi/Ethernet access details.
- Define rollback triggers (time limit, instability threshold, missing drivers) before you start.
Preparing a Full System Backup and Restore Plan
Best for: anyone upgrading a primary work/study PC, multi-partition systems, laptops with vendor-specific drivers, and machines with BitLocker enabled. It is also strongly recommended if you plan to change edition or do a clean install after the upgrade.
Do not proceed (pause and fix first) if your disk shows errors, Windows is already crashing frequently, you cannot free enough space for a snapshot, or you have no way to boot from USB. In those cases, stabilize the system first or use a professional บริการอัปเกรด Windows และติดตั้งไดรเวอร์.
Backup approach options (choose based on your constraints)
| Scenario | Recommended backup type | Tool examples | Expected outcome |
|---|---|---|---|
| Enough external storage available | Full system image + file backup | Windows System Image (where available), third‑party imaging; File History/robocopy | Fast restore to pre-upgrade state + independent access to documents |
| Limited backup space | File-level backup + restore point (secondary) | โปรแกรมสำรองข้อมูลก่อนอัปเดต Windows (file backup), File History, robocopy | Data protected; OS rollback may be slower or require reinstall |
| Offline system (no internet during upgrade) | Image backup + offline driver package | Imaging tool + driver export (DISM) + vendor driver installers saved locally | Recovery possible without downloads |
Practical backup checklist
- Capture an image backup to external storage. Use an imaging tool that can create bootable recovery media; verify the image completes without errors.
- Back up user data separately. Copy
C:Users<you>Documents, Desktop, Pictures, browser profiles, and any project folders to an external disk or NAS. - Export app-specific configs/licenses. If you plan to ซื้อไลเซนส์ Windows 11 แท้ or change edition, save activation details for paid apps (where allowed) and sign-out/in plans.
- Test visibility of backups. From another PC, open a few files from the backup drive to ensure it is readable.
Inventory and Export Your Drivers Safely
You will need: an admin account, an external drive (or a second internal partition), and enough free space to store exported drivers. For offline PCs, also prepare vendor driver installers in advance (chipset, storage, LAN/Wi‑Fi, GPU).
- Access: Local admin, BitLocker recovery key (if enabled), and BIOS/UEFI access.
- Tools: Device Manager, PowerShell/Command Prompt, DISM, and optional vendor utilities (Intel/AMD/NVIDIA, laptop OEM support app).
Export installed drivers (built-in, safest baseline)
- Create a driver export folder. Example:
D:DriverBackup(prefer external drive if possible). - Run DISM export as admin. Open Terminal (Admin) and run:
dism /online /export-driver /destination:D:DriverBackup - Document critical devices. In Device Manager > each key device > Properties > Details > Hardware Ids, copy IDs for network, storage controller, and GPU.
- Pre-download vendor packages (recommended). Save installers so you can reinstall quickly if Windows uses a generic driver. This is the practical meaning of preparing to ดาวน์โหลดไดรเวอร์คอมพิวเตอร์ Windows 11 in advance.
Creating Bootable Recovery and Installation Media
- Risk: Wrong partition selection can wipe data; disconnect non-essential external drives before creating or using boot media.
- Risk: Secure Boot/UEFI settings may block booting; confirm your firmware boot menu key (often F12/F9/Esc/Del).
- Risk: BitLocker can lock you out after firmware changes; save the recovery key before you start.
- Limitation: Some third‑party imaging tools require their own recovery environment; test boot once before upgrading.
-
Prepare a clean USB drive.
Use a USB drive you can erase. Keep it dedicated to recovery to avoid mixing files that could confuse boot detection.- Disconnect unnecessary storage devices to reduce the chance of writing to the wrong disk.
-
Create Windows installation media.
On a working PC, use Microsoft's official media creation workflow to produce a bootable installer USB for Windows 11. This gives you an escape hatch if the upgrade fails mid-way.- If the target PC is offline, do this step on another internet-connected machine and bring the USB to the target.
-
Create recovery media for your backup image (if using imaging software).
Use the imaging tool's "Create Rescue Media" option and ensure it supports UEFI systems. Label it clearly (date + PC name). -
Test boot into recovery before upgrading.
Reboot, open the boot menu, and confirm you can reach either Windows Setup or the imaging recovery environment without errors.- Expected outcome: you can see internal disks and your external backup drive.
-
Store drivers and keys on the same recovery drive (optional).
CopyDriverBackupand a text file containing Wi‑Fi SSID/password hints and BitLocker recovery key reference (do not store secrets on a shared drive).
Testing Compatibility: Apps, Hardware, and Firmware
- Confirm the device meets Windows 11 requirements (UEFI, Secure Boot capability, TPM enabled in firmware).
- Update BIOS/UEFI only if you have a clear need (e.g., known TPM/Secure Boot bugs) and stable power; otherwise, postpone firmware updates until after the OS upgrade is stable.
- Check free disk space on
C:and ensure temporary files can be cleaned without removing needed data. - List critical apps (VPN, accounting, CAD, printer tools, antivirus/EDR) and confirm you have installers and sign-in credentials.
- Verify your network path: at least one working method (Ethernet recommended) so drivers and updates can be retrieved post-upgrade.
- Record peripheral dependencies: printer/scanner model, docking station, USB audio, specialized input devices.
- Ensure you have Windows activation path clarified (digital license vs. key). If you plan to ซื้อไลเซนส์ Windows 11 แท้, do it from a reputable channel and keep proof of purchase.
Compatibility matrix you can fill before you start
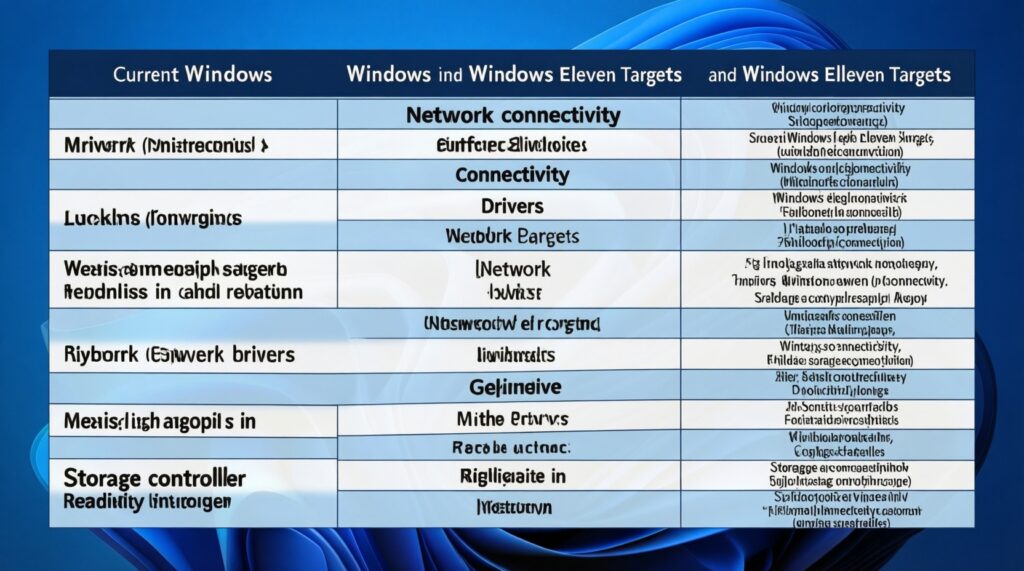
| Component / App | Current Windows (before) | Windows 11 (target) | Driver / installer source prepared? | Pass/Fail criteria |
|---|---|---|---|---|
| Network (LAN/Wi‑Fi) | Works now | Must work immediately | Exported driver + vendor package saved | Connects to internet within minutes after first boot |
| Storage controller (NVMe/SATA/RAID) | Stable | Must remain stable | Chipset/storage driver saved | No boot loops; no disk errors in Event Viewer |
| GPU (Intel/AMD/NVIDIA) | Correct resolution/acceleration | Correct resolution/acceleration | Vendor driver saved | No flicker; proper refresh rate; apps use GPU |
| Critical business app | Working | Must launch and authenticate | Installer + license/sign-in available | Opens files; prints/exports as expected |
| Printer/Scanner | Working | Must print/scan | Driver package saved | Test page prints; scan completes |
Step-by-Step Upgrade Procedure to Minimize Risk
- Stop non-essential background tools. Uninstall or disable third-party antivirus "tuning" utilities and disk encryption add-ons you do not fully control; they frequently block upgrades or break drivers.
- Enable a stable power and network path. Use AC power for laptops and prefer Ethernet. A network drop during driver detection is a common reason devices come up "unknown."
- Disconnect unnecessary peripherals. Leave only keyboard/mouse and one display. Remove printers, docks, external GPUs, and USB storage (except the backup drive, if needed).
- Run Windows Update and reboot. Apply pending servicing updates first, then reboot twice. This reduces component store issues during the Windows 11 upgrade.
- Confirm BitLocker state and keys. If BitLocker is enabled, ensure you can access the recovery key. If you must change firmware settings, suspend BitLocker temporarily and resume after a successful upgrade.
- Start the upgrade from Windows (in-place) when possible. In-place upgrade typically preserves apps and drivers. Use Windows Setup from a mounted ISO/USB and select "Keep personal files and apps" if available.
- Do not accept ambiguous prompts. If setup warns that a driver/app must be removed, stop and assess whether it is critical (VPN, storage, security). Removing a storage or chipset driver can make the system unbootable.
- Watch the first reboot cycle. If it loops or freezes repeatedly, don't keep forcing power-offs. Use recovery media to enter Advanced Startup and choose Startup Repair or revert.
- Set rollback triggers upfront. Roll back if you lose network plus no offline driver works, if storage/controller devices show errors, or if critical apps cannot run after reasonable driver reinstall attempts.
Post-Upgrade Verification: Performance, Drivers, and Security
Use one of these paths depending on what you see after first login.
Option A: Standard stabilization (most PCs)
- Run Windows Update until no more updates are offered, then reboot.
- Install vendor GPU/chipset/network drivers if Windows installed generic ones.
- Verify Device Manager has no Unknown devices and no warning icons.
Option B: Offline recovery path (no internet available)
- Install drivers from your exported folder or saved vendor installers (start with chipset/storage/network, then GPU).
- Only after network works, run Windows Update (or bring updates via offline servicing if you manage multiple PCs).
Option C: Limited storage / low free space
- Use Disk Cleanup / Storage Sense to remove temporary update files, then re-run Windows Update.
- If
Windows.oldis required for rollback, keep it until your validation is complete; delete it only after you are confident the system is stable.
Option D: Escalate to professional service when drivers are business-critical
- If the PC is tied to specialized peripherals (POS, label printers, industrial USB devices) and downtime is expensive, consider บริการอัปเกรด Windows และติดตั้งไดรเวอร์ with a clear scope: backup verification, driver packaging, and post-upgrade testing.
Compact post-upgrade checklist (quick validation)
| Check | Where | Expected result | If failed |
|---|---|---|---|
| Activation status | Settings > System > Activation | Windows is activated | Sign in, re-enter key, or validate your plan to ซื้อไลเซนส์ Windows 11 แท้ |
| Unknown devices | Device Manager | No warning icons | Install from exported drivers; then vendor packages |
| Network stability | Settings > Network & internet | Stable LAN/Wi‑Fi | Reinstall network driver; use Ethernet; then ดาวน์โหลดไดรเวอร์คอมพิวเตอร์ Windows 11 |
| Disk health | Event Viewer > Windows Logs > System | No repeated disk/controller errors | Install chipset/storage drivers; consider rollback if persistent |
| Core apps launch | Your app list | Apps open and sign in | Reinstall dependencies; check compatibility; rollback if blocking work |
| Security baseline | Windows Security | No critical warnings | Re-enable protections; remove conflicting security tools |
Common upgrade pitfalls and concise remedies
My PC fails to boot after the upgrade-what is the safest first move?
Boot from your recovery/installation USB, enter Advanced Startup, and run Startup Repair. If that fails and you have a verified image backup, restore it rather than attempting random fixes.
Windows 11 boots but Wi‑Fi/Ethernet is missing-how do I recover quickly?
Install the exported network driver first, then the vendor network package if needed. If you prepared offline drivers, you can restore connectivity without relying on Windows Update.
Device Manager shows Unknown devices-what should I install first?
Install chipset and storage/controller drivers first, then network, then GPU. This order prevents cascading issues where Windows mis-detects buses and leaves multiple devices broken.
Setup says an app or driver must be removed-should I proceed?

Pause if it is security software, VPN, storage, or device-control tooling. Remove only if you have the installer and a tested replacement plan; otherwise postpone the upgrade and resolve compatibility.
I have little space for backups-what is the minimum acceptable safety net?
At minimum, do a file-level backup of irreplaceable data plus an exported driver set, and ensure you can boot from Windows installation media. Without an image backup, accept that rollback may require reinstalling Windows and apps.
After อัปเกรด Windows 11, performance feels worse-what should I check before blaming the OS?
Finish Windows Update, install vendor GPU/chipset drivers, and check Task Manager for background indexing or update activity. If disk/controller errors appear in Event Viewer, treat it as a rollback trigger.